Electrospinner for Nanofiber Fabrication
Nov 2024 - Mar 2025
First time I get to know about Electrospinning at IIT Delhi when my project guide asked me to develop a cost-effective setup to collect the nanofibers using high potential difference between the source and the collector.
The idea that you can take a liquid polymer solution, apply a high voltage, and create fibers thinner than a human hair, sometimes just a few hundred nanometers across, feels like a mix of physics, chemistry, and a bit of magic. While commercial electrospinning machines exist, they are often expensive and limited in flexibility. So, It was a challenge to build one from scratch, one that not only works reliably but can also be tuned, modified, and understood from the ground up.
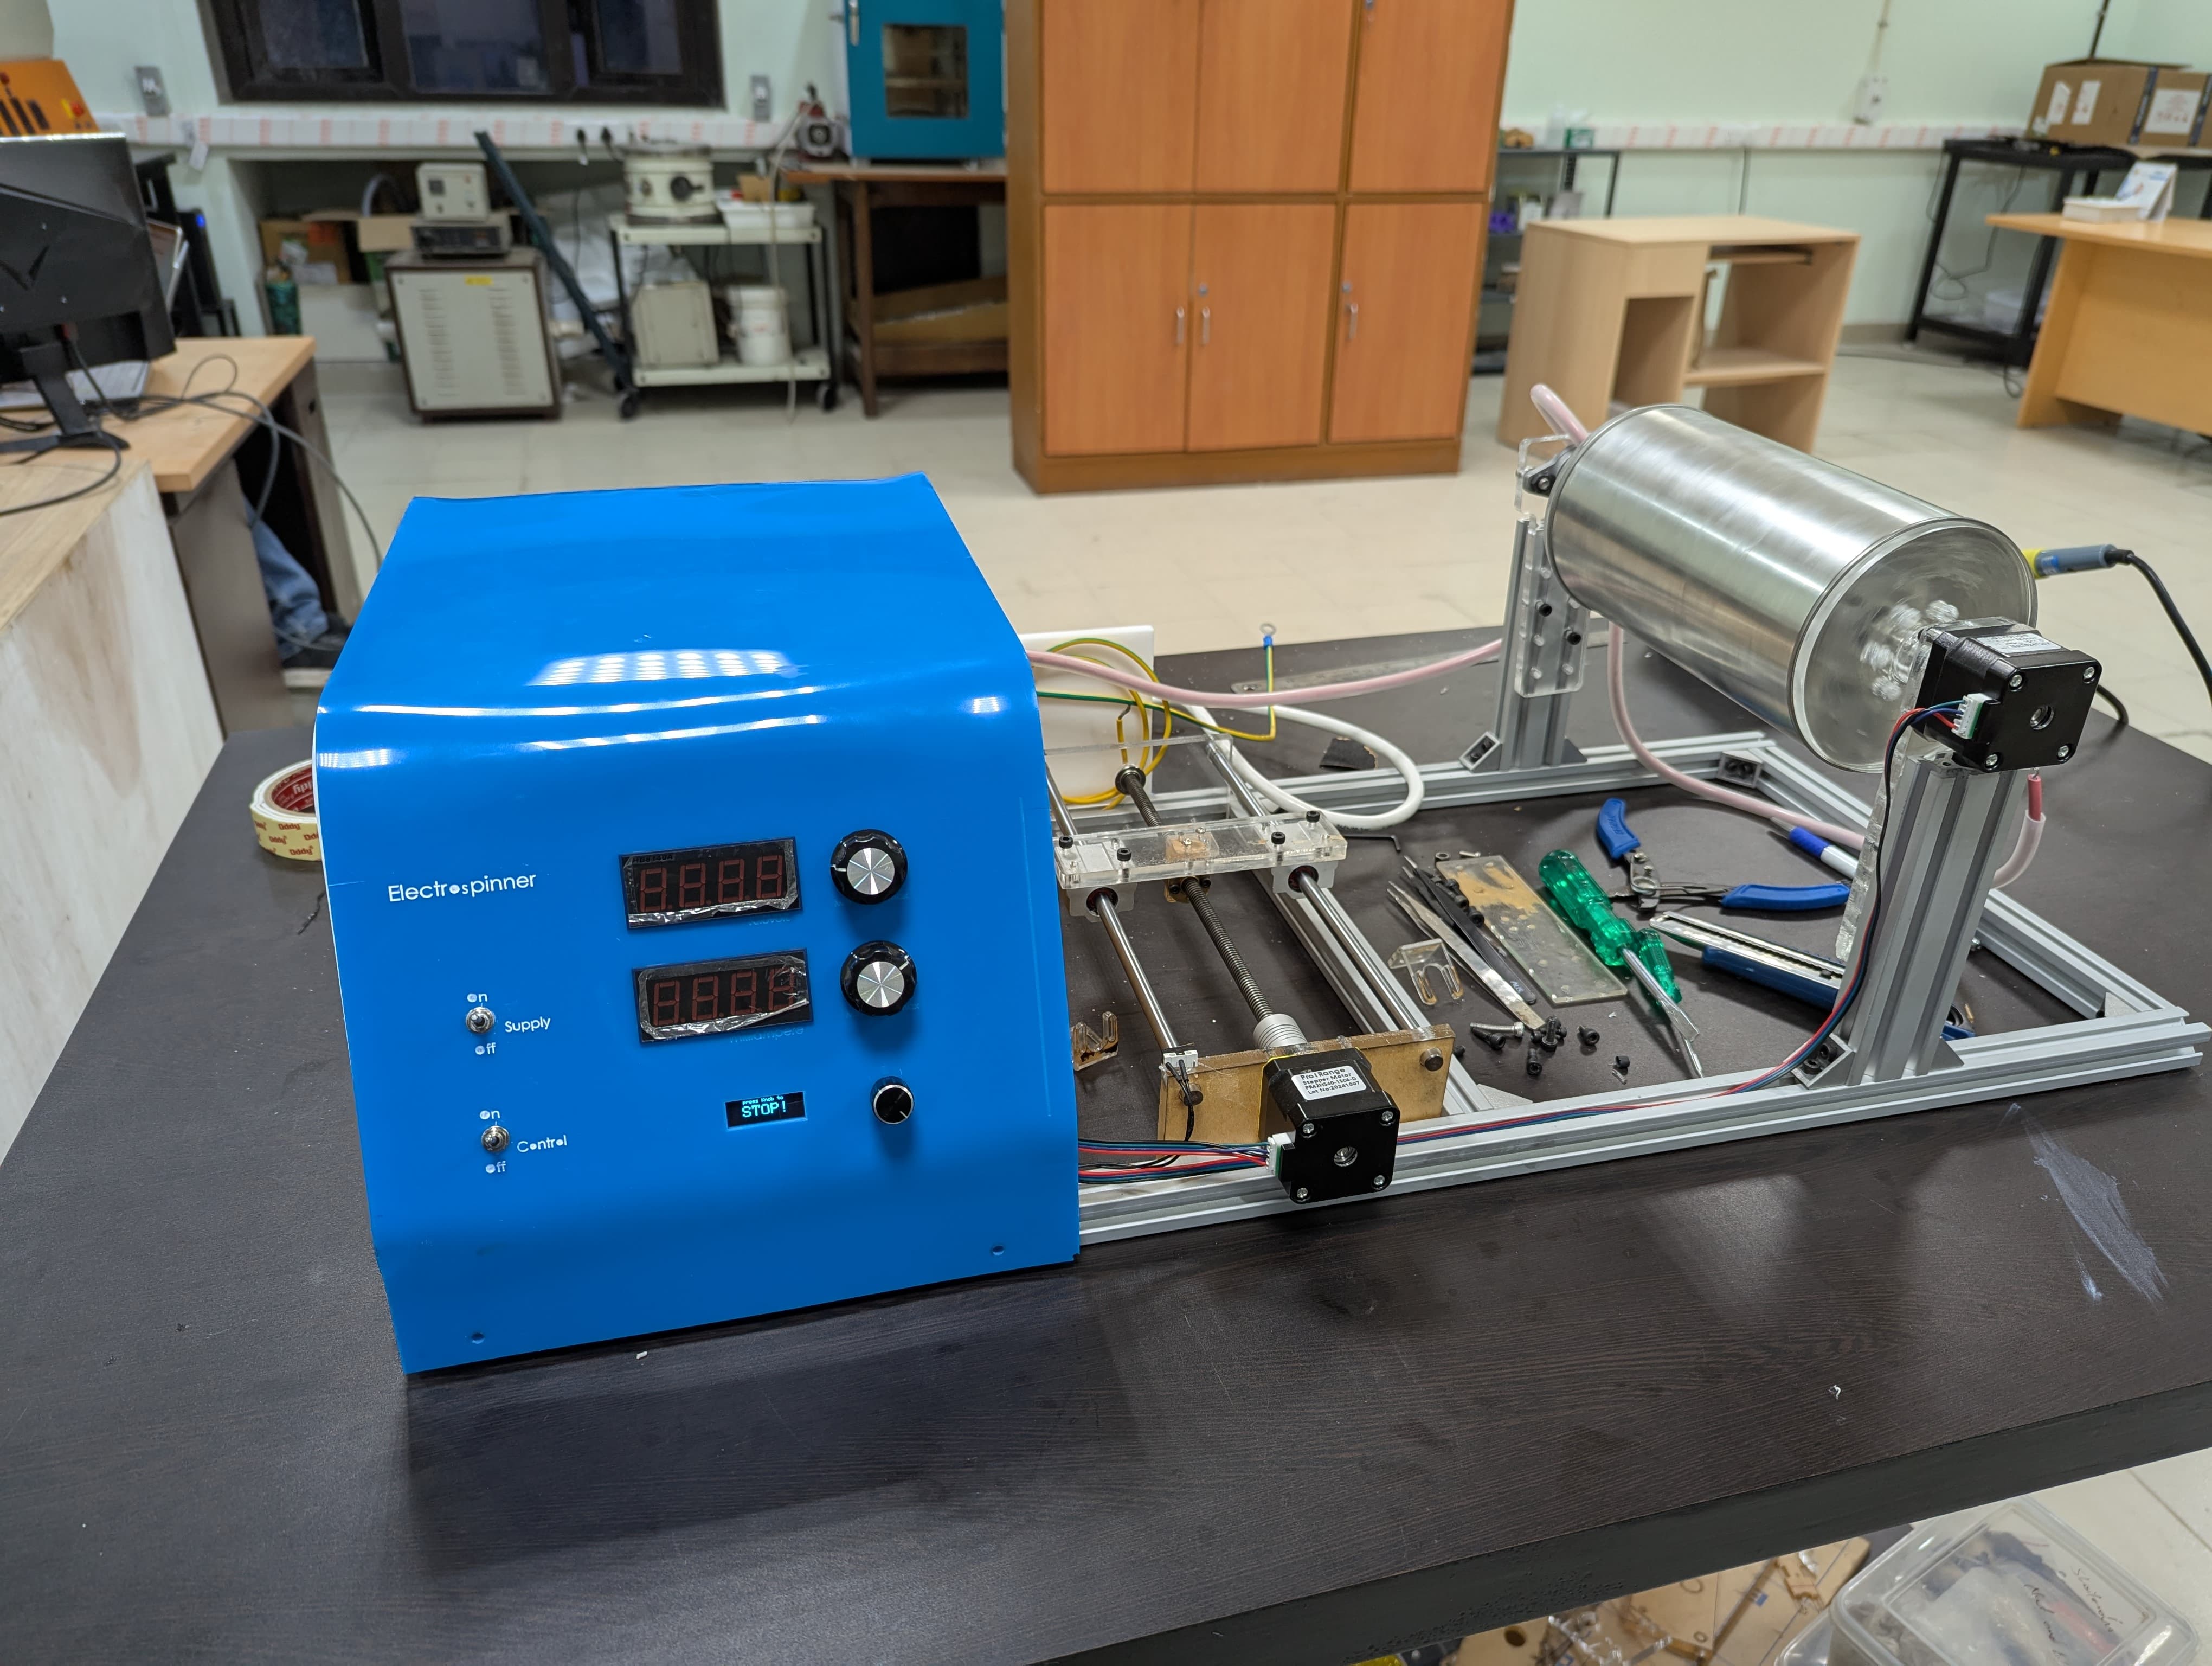
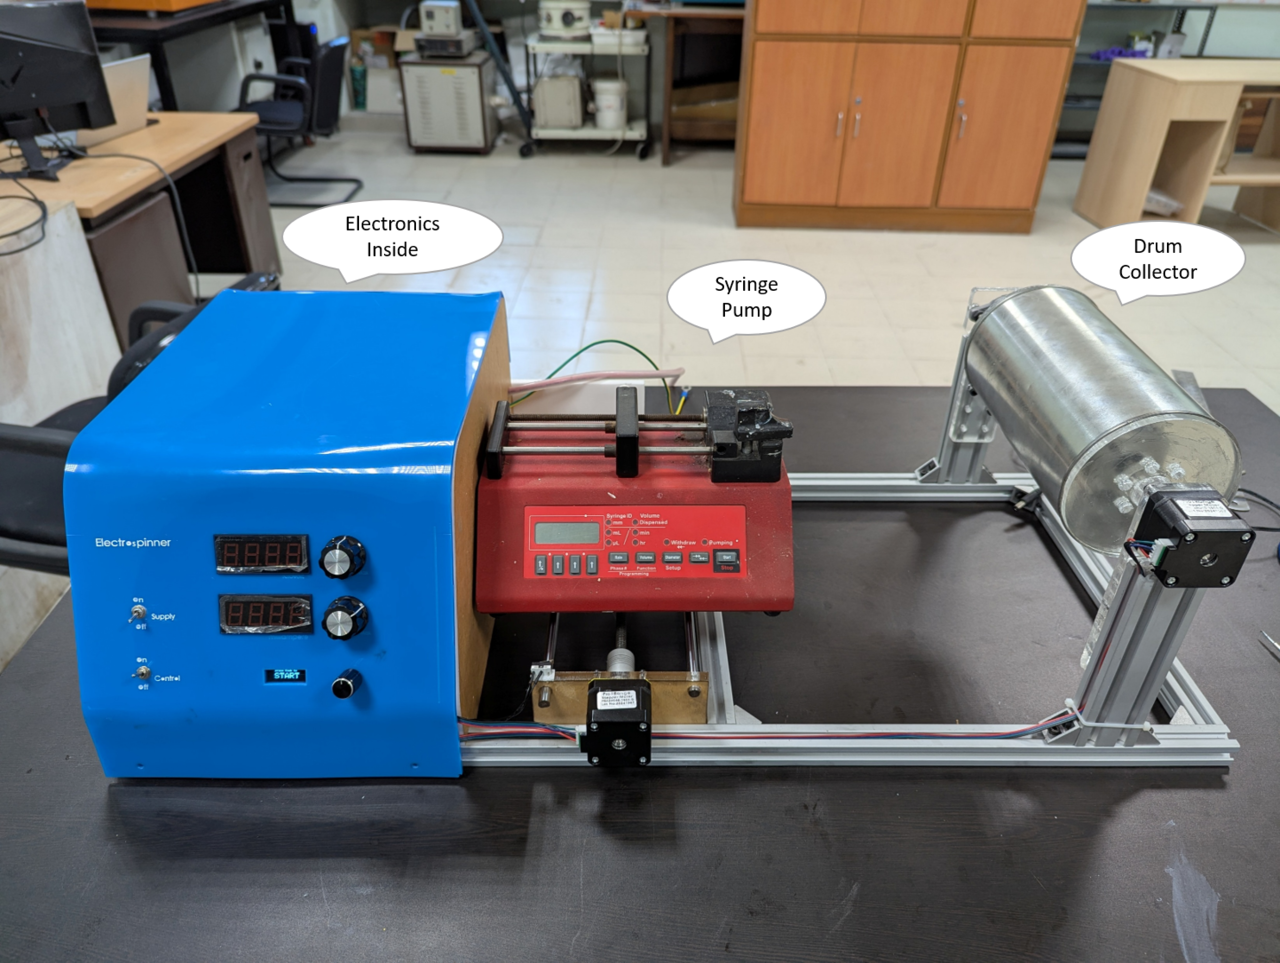
This project resulted in a fully functional electrospinner, controlled by an Arduino Nano, capable of depositing uniform nanofiber mats on a rotating drum collector. The syringe pump moves back and forth automatically to ensure even fiber distribution, and the whole setup is enclosed in a sturdy aluminum frame with a neatly designed control panel.
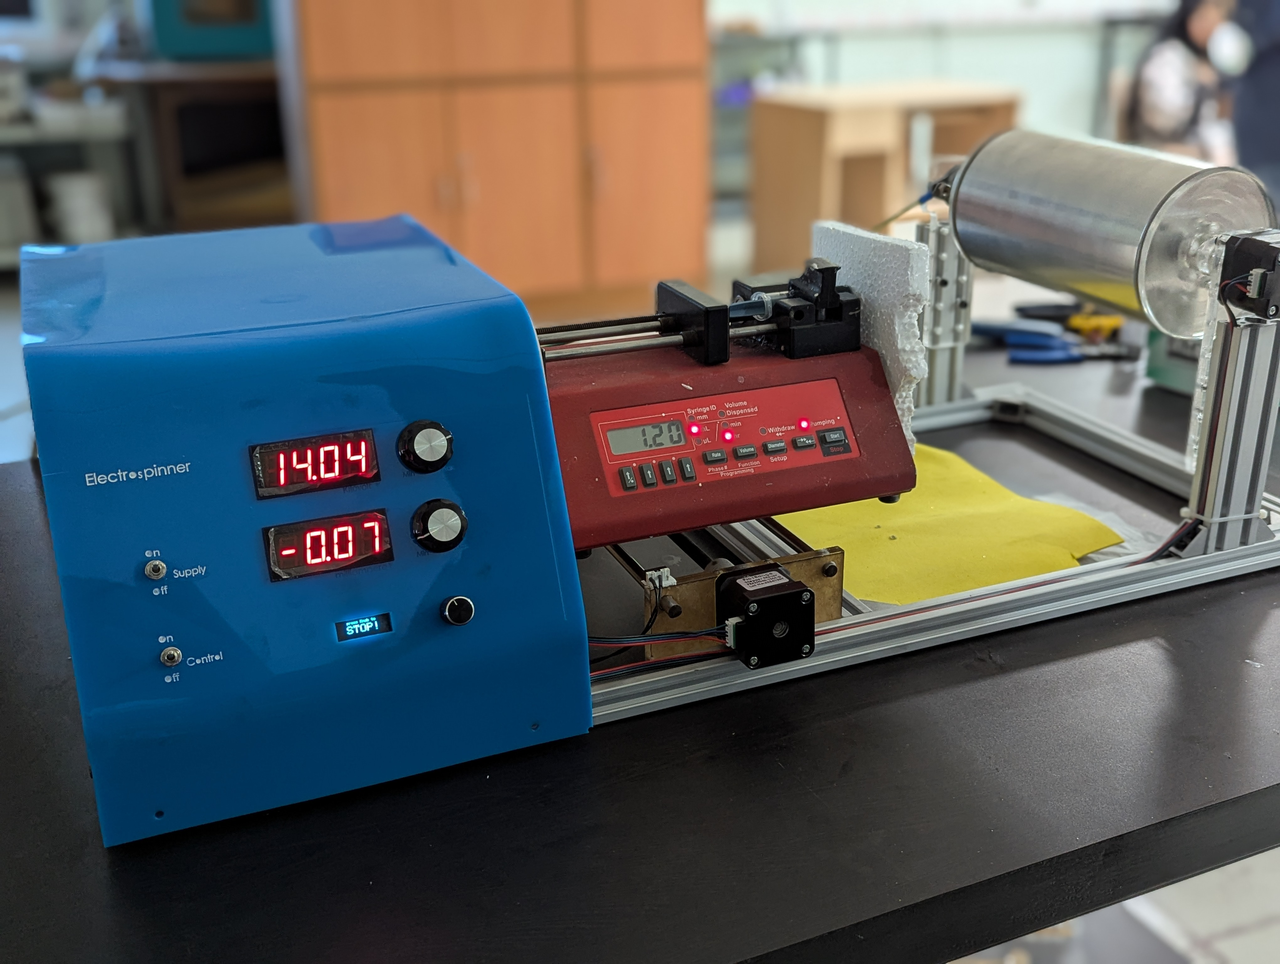
Electrospinner in action depositing nanofibers on the rotating drum.
here is how through how I built it, from the science behind electrospinning to hardware design, technical implementation, and final testing.
What is Electrospinner?
At its core, electrospinning is a fiber fabrication technique that uses electrostatic forces to draw charged threads of polymer fibers.
You start with a syringe filled with polymer solution and apply a high voltage between the needle tip and a grounded collector plate or drum.
When the voltage is high enough, the electrostatic repulsion overcomes the surface tension of the liquid droplet at the needle tip. The droplet elongates into what_s called a Taylor cone, and a fine jet of polymer shoots out.
As the jet travels through the air, the solvent evaporates, leaving behind a solid nanofiber, which gets deposited on the collector.
By controlling the voltage, flow rate, and collector geometry, you can influence the fiber diameter, orientation, and morphology.
For this project, I wanted a rotating drum collector, which aligns the fibers as they are collected, which is useful for creating thin, uniform nanofiber.
To achieve even deposition along the drum_s length, I also made the syringe move back and forth automatically, synchronized with the spinning drum.
Hardware Design
The heart of the system is an Arduino Nano, chosen for its simplicity and flexibility. It’s small, reliable, and easy to program for integrating sensors, displays, and motor drivers.
Main Components
The setup consists of three main mechanical subsystems:
Controller for High voltage and stepper motors
Rotating Drum Collector
The collector drum is driven by a NEMA17 stepper motor. The rotation speed directly affects how the fibers align and how thickly they accumulate. Using pulse-width modulation (PWM), I can precisely control the drum speed from about 50 to 200 RPM. The drum is mounted on bearings for smooth rotation, and is grounded to serve as the fiber collector.
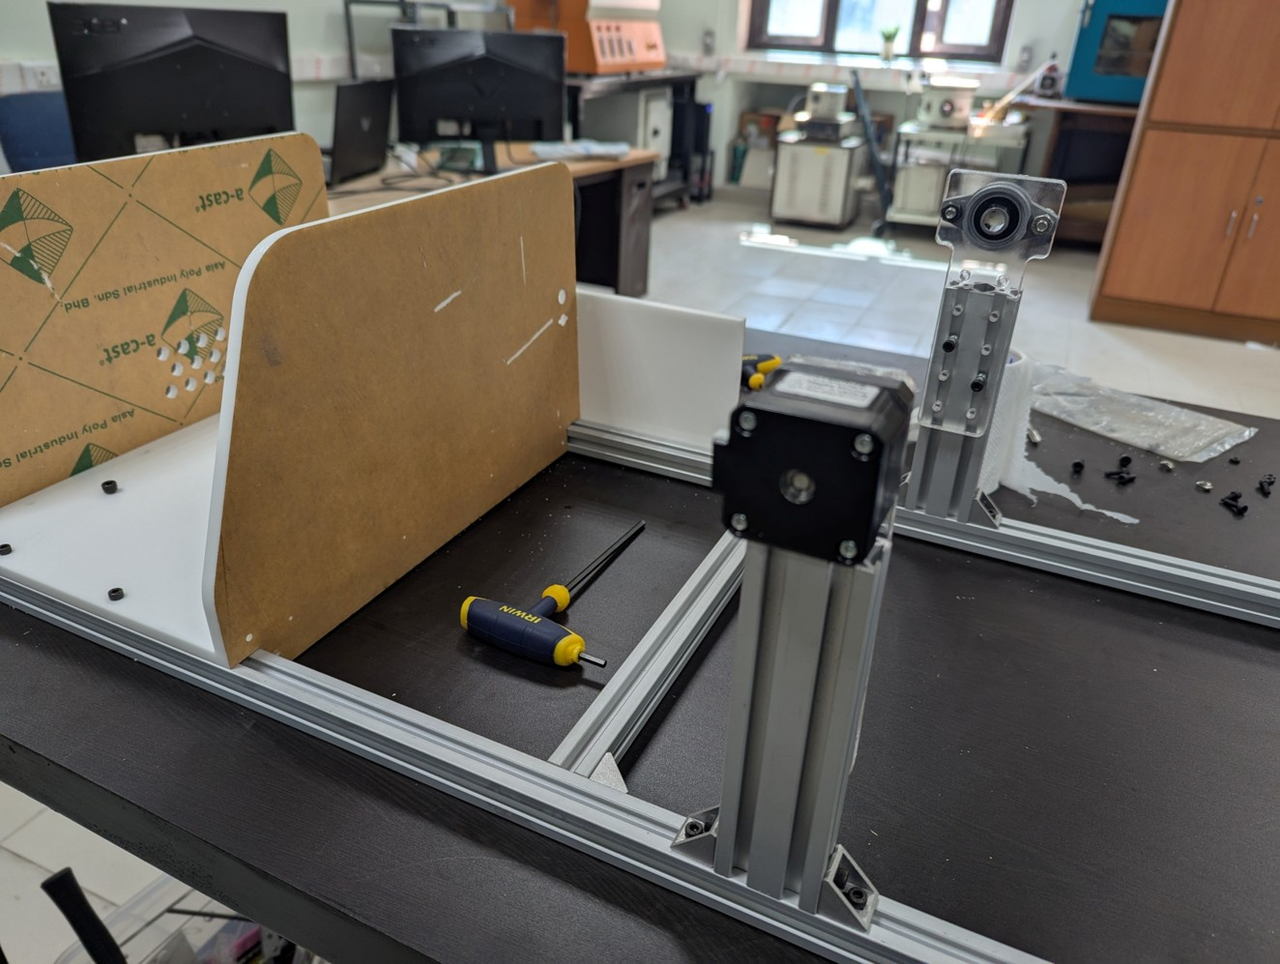
Syringe Pump Motion System
The syringe is mounted on a small platform connected to a stepper motor and a lead screw. The stepper provides controlled linear motion which moves the syringe pump back and forth across the drum_s width.
This ensures the fibers are deposited uniformly rather than piling up in one spot. The direction automatically reverses when the syringe reaches the end of travel, creating a continuous sweeping motion.
Structural Frame
The structure is built using 20*20 mm aluminum extrusions, which are lightweight, strong, and modular. They provide excellent rigidity while allowing me to easily adjust or add components later.
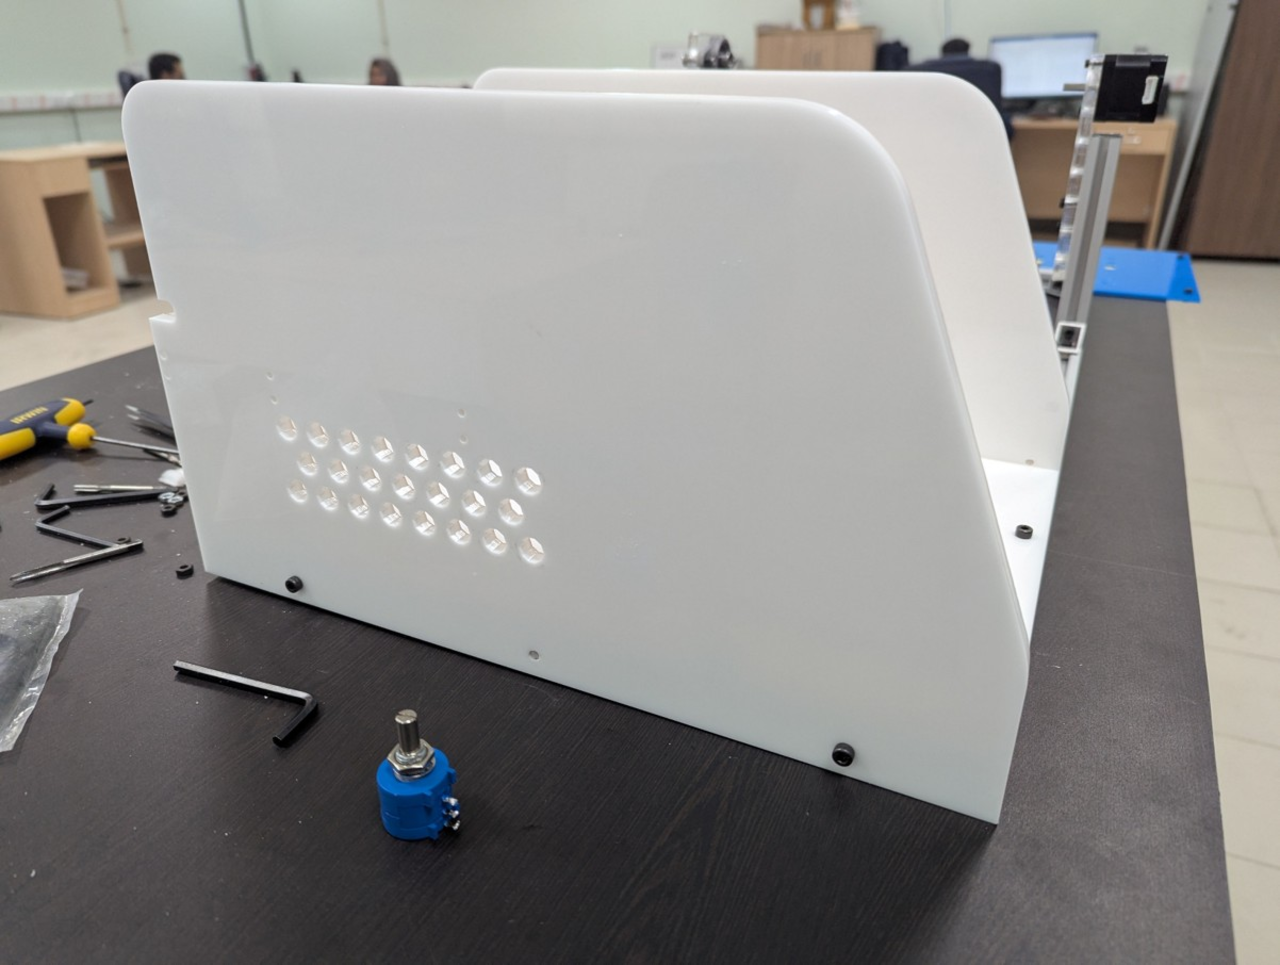
The extrusions also form the base for the electronics enclosure and support the high-voltage components. For the rest of the structure acrylic sheets with a good 8mm thickness was a best choice while working with a high voltage setup to keep the user alive for another day.
The voltage source and TMC stepper drivers for low naise operation
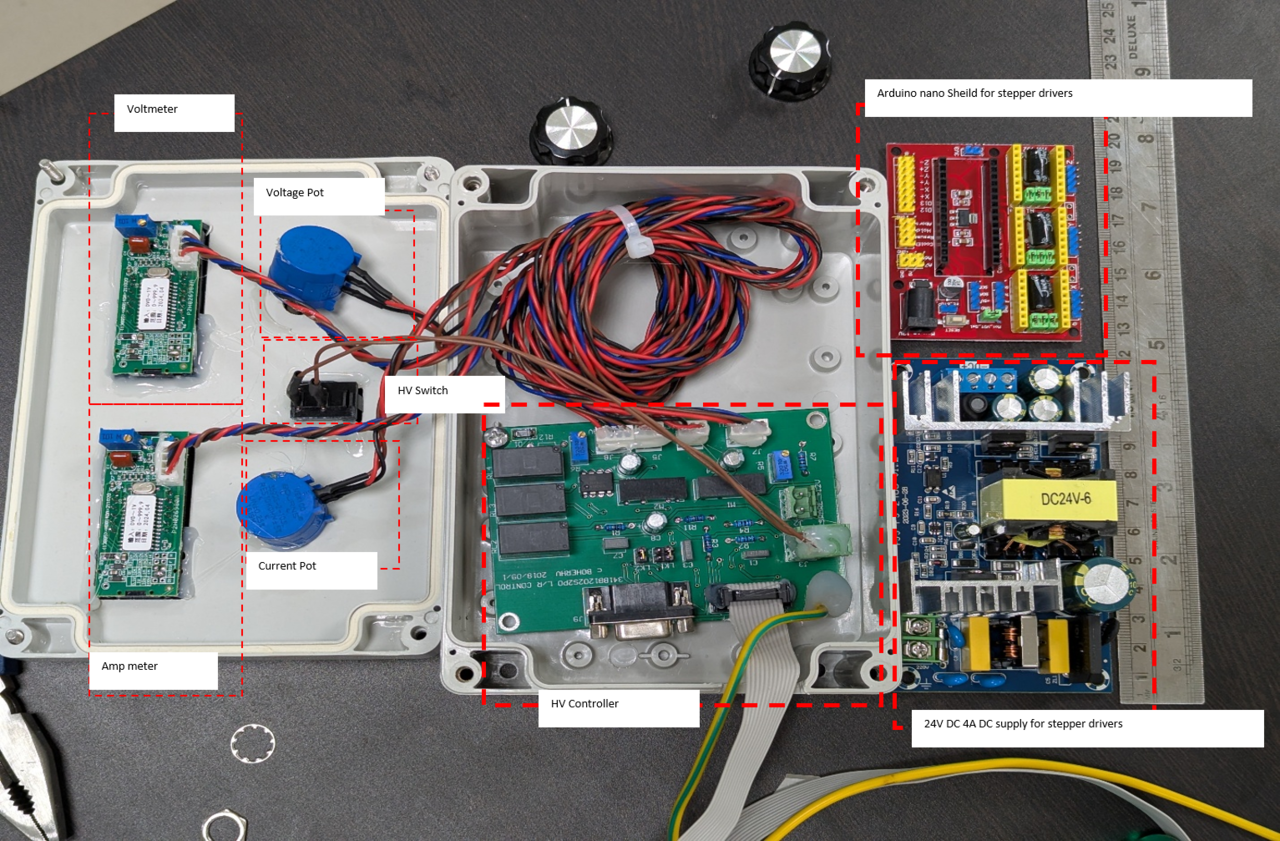
High Voltage Source and Controller
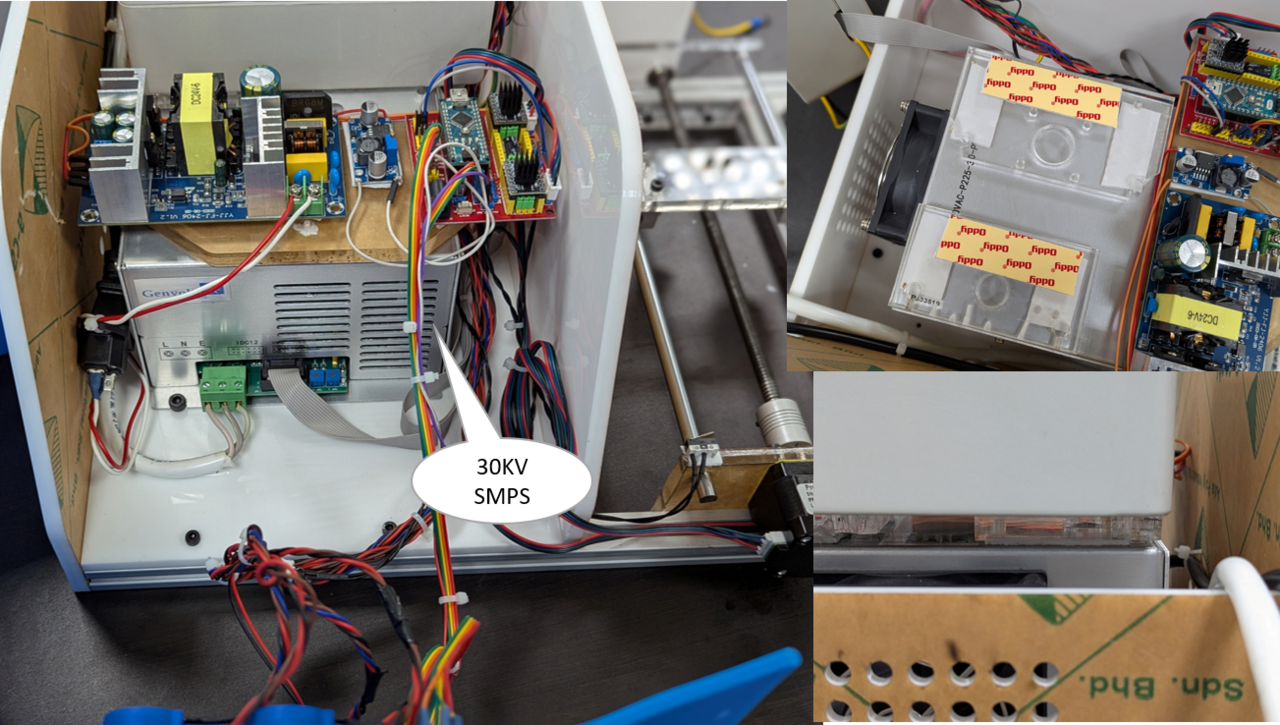
Our lab had one unused high voltage source (SMPS) with voltage and current controller, that can go up to 30KV.
So, I was just lucky enough to get it, or I would have to make my own. With that plus point I started designing the front panel that consist of two multiturn bourns potentiometer for voltage and current control with a display for each voltage and current.
putting together the electronics assembly
Our lab had one unused high voltage source (SMPS) with voltage and current controller, that can go up to 30KV. So, I was just lucky enough to get it, or I would have to make my own.
With that plus point I started designing the front panel that consist of two multiturn bourns potentiometer for voltage and current control with a display for each voltage and current.
Technical Implementation
This is where the project really came alive after integrating all the electronics, motion control, and user interface.
Controller and Power System
The Arduino Nano acts as the central brain of the electrospinner. It reads inputs, controls motor speeds, and manages safety limits.
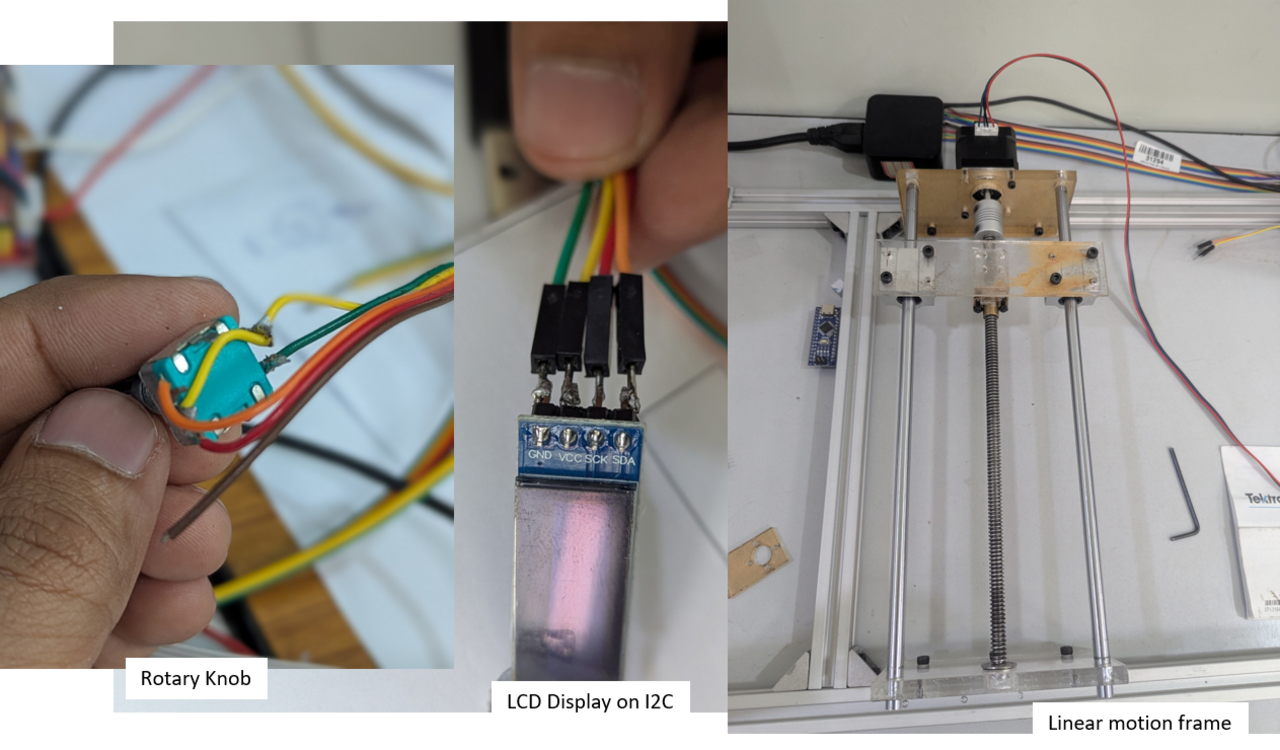
Linear motion system for syringe pump, knob and I2C display
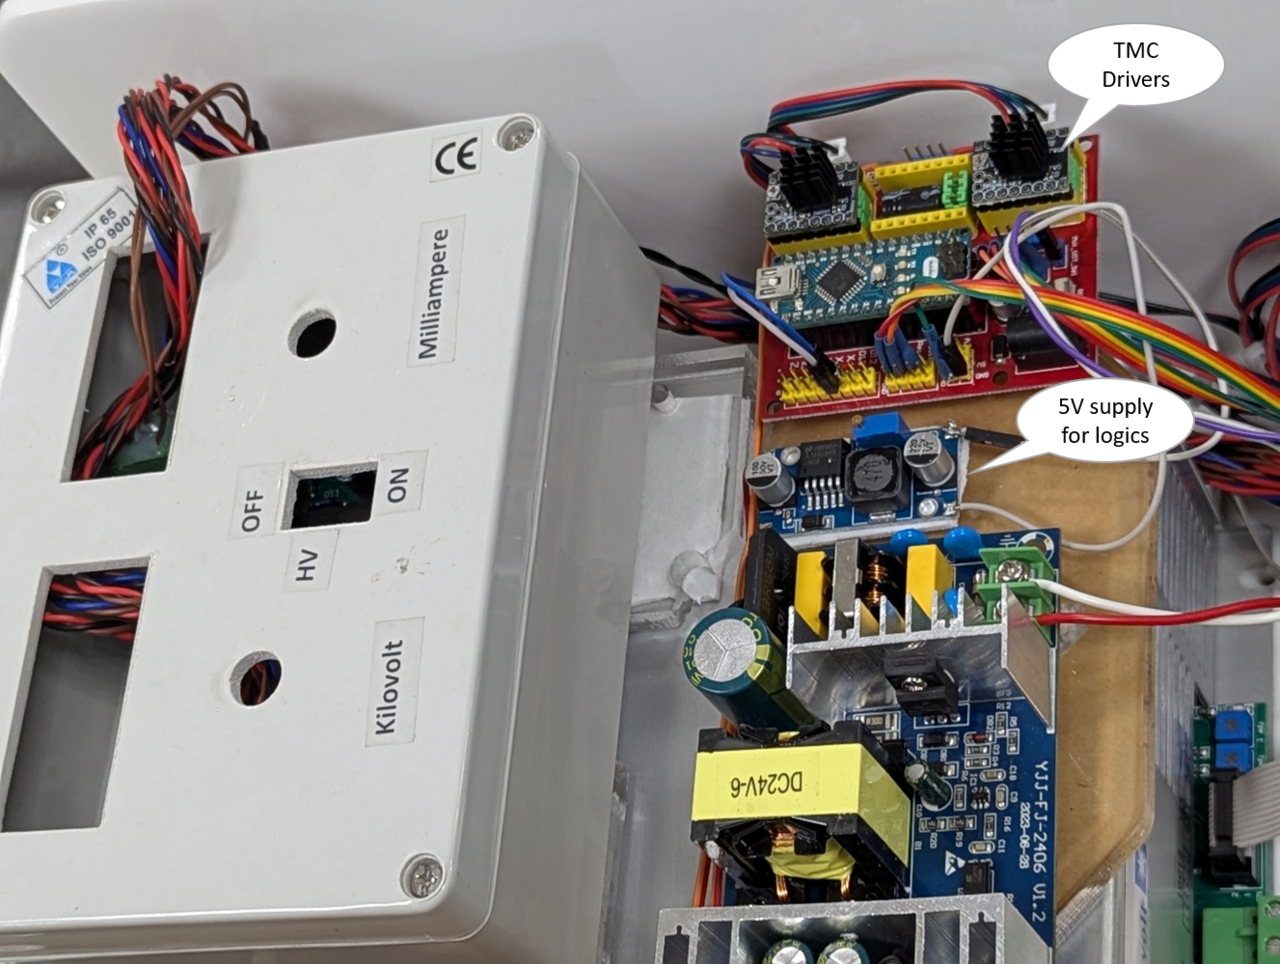
Drum Motor Control: The drum s stepper motor is driven through TMC2208 driver module,
(take away: when you use the generic A4988 driver it makes your stepper cry like hell!) allowing speed and direction control. PWM signals from the Arduino control the speed precisely.
The syringe motion was also handled by same TMC2208 stepper driver, which receives pulse and direction signals from the Arduino. I implemented acceleration ramps to prevent sudden jerks that might disturb fiber formation. And yes, you can set those jerks if you want. Just use the rotary knob for fun.
High Voltage Supply: A commercial high-voltage module capable of generating up to 30 kV DC powers the electrospinning needle.
The Arduino does not directly handle such voltages, of course its just a new born infant XD, instead a separate controller for the HV SMPS was already there with voltmeter and current meter that I just extended, allowing me to set the output voltage safely from the control panel.
Adjustable drum height for different syringe sizes
Control Interface
A rotary encoder with a push-button serve as the main user input. Turning the knob adjusts parameters like drum speed or voltage; while pressing it confirms selections indicating e on the screen which refers to editing mode.
An LCD display shows live parameters like drum RPM, and syringe travel status.
the system does not remember the last configuration so when you lose the power you will have to start again, but I will fix that later.
External case design of electrospinner electronics
All of this runs on a neatly organized non-blocking main loop that constantly updates motor speeds and listens for user input with this a good mix of real-time control and usability was achieved.
Case Design & Safety
Working with high voltage always demands extra caution. For this reason, I devoted a lot of attention to enclosure design and safety mechanisms. The electronics are enclosed in a well-ventilated acrylic case, with separate partition for Low-voltage control electronics (Arduino, drivers, and display) and High-voltage section (HV supply and needle terminal).
All HV connections are shielded and proper grounding is given. The collector drum itself is connected to earth ground, ensuring charge dissipation during operation.
Ready to test some fibers
A main power switch with fuse protection , and clear status indicators for HV ON/OFF and system operation.
In future a small cooling fan inside the enclosure can be fitted to prevent heat buildup when running for long periods.
From a design standpoint, the ventilated case not only improved safety but also gave the whole setup a professional, lab-grade appearance. The modular aluminum frame made it easy to mount the syringe assembly, collector drum, and control box in alignment, with cable management channels for a clean look.
Performance testing
Once everything was assembled, I spent several sessions fine-tuning the control parameters and verifying performance.
The collector drum speed was tested in range from slow rotations around 30 RPM for random fiber mats to higher speeds up to 200 RPM for more aligned fibers. The syringe pump platform moved smoothly across its travel path, ensuring even deposition of fibers over the drum surface.
The high voltage was gradually ramped from 10 kV to about 25 kV during operation. At the right settings, a stable jet formed at the needle tip, and thin fibers started collecting beautifully on the drum.
I also tested different polymer solutions like Polyacrylonitrile PAN developed by a cool PhD guy Tarun in IIT Delhi to observe the fiber morphology under varying conditions. Even with basic parameters, the results were consistent smooth, bead-free fibers when the voltage, distance, and flow rate were balanced. For long run we kept it nearby an open window.
cheese time for electrospinner
For more precise evaluation, the collected mats were examined under an optical microscope. The fibers appeared continuous and uniform, confirming that the system was performing as expected.
Real-World Application
Nanofibers have a wide range of applications, from air and water filtration membranes to tissue engineering scaffolds, sensors, and even energy storage materials.
By building this electrospinner, a research-ready platform for exploring new materials and optimizing spinning parameters is ready to use for anyone in my lab.
Because everything is modular and open-source, I can easily:
Add temperature and humidity control for environment-sensitive polymers, integrate a flow sensor to monitor syringe output, Implement multi-needle setups for higher throughput, Or even automate the entire process via computer control using serial commands.
Another exciting direction is to interface the Arduino with a Bluetooth or Wi-Fi module, allowing remote monitoring and control of parameters from a phone or computer.
The flexibility of this in house-built setup means it can evolve with each experiment, rather than being fixed like commercial machines.
Learnings
Building this electrospinner was a deeply rewarding project. It combined my interests in electronics, mechanical design, and materials science, and gave me a practical understanding of how multidisciplinary systems come together.
Some key takeaways:
Safety design is as important as performance. Handling 30 kV requires respect and planning. Motion synchronization between the syringe and drum made a huge difference in uniform fiber collection.
Using Arduino simplified the development process enormously, and the open-source ecosystem meant anyone could experiment freely.
Designing the enclosure and front panel gave me a better appreciation for industrial design and usability.
Seeing the first layer of nanofibers collect evenly on the drum was one of those moments that make all the troubleshooting worth it. The combination of careful design and hands-on testing paid off beautifully.
Conclusion
From a concept on paper to a fully functioning laboratory device, this project demonstrates what can be achieved with resourcefulness, curiosity, and a bit of engineering creativity. The electrospinner I built is not just a prototype it is a robust platform for experimenting with nanofiber fabrication, adaptable for future research and applications.
What excites me most is that this setup can inspire other students, makers, and researchers to build their own systems understanding every wire, and line of code that makes it work. Because in the end, building something from scratch does not just create a tool it creates knowledge.